
How to connect our robot car to the Internet and control it on a global scale
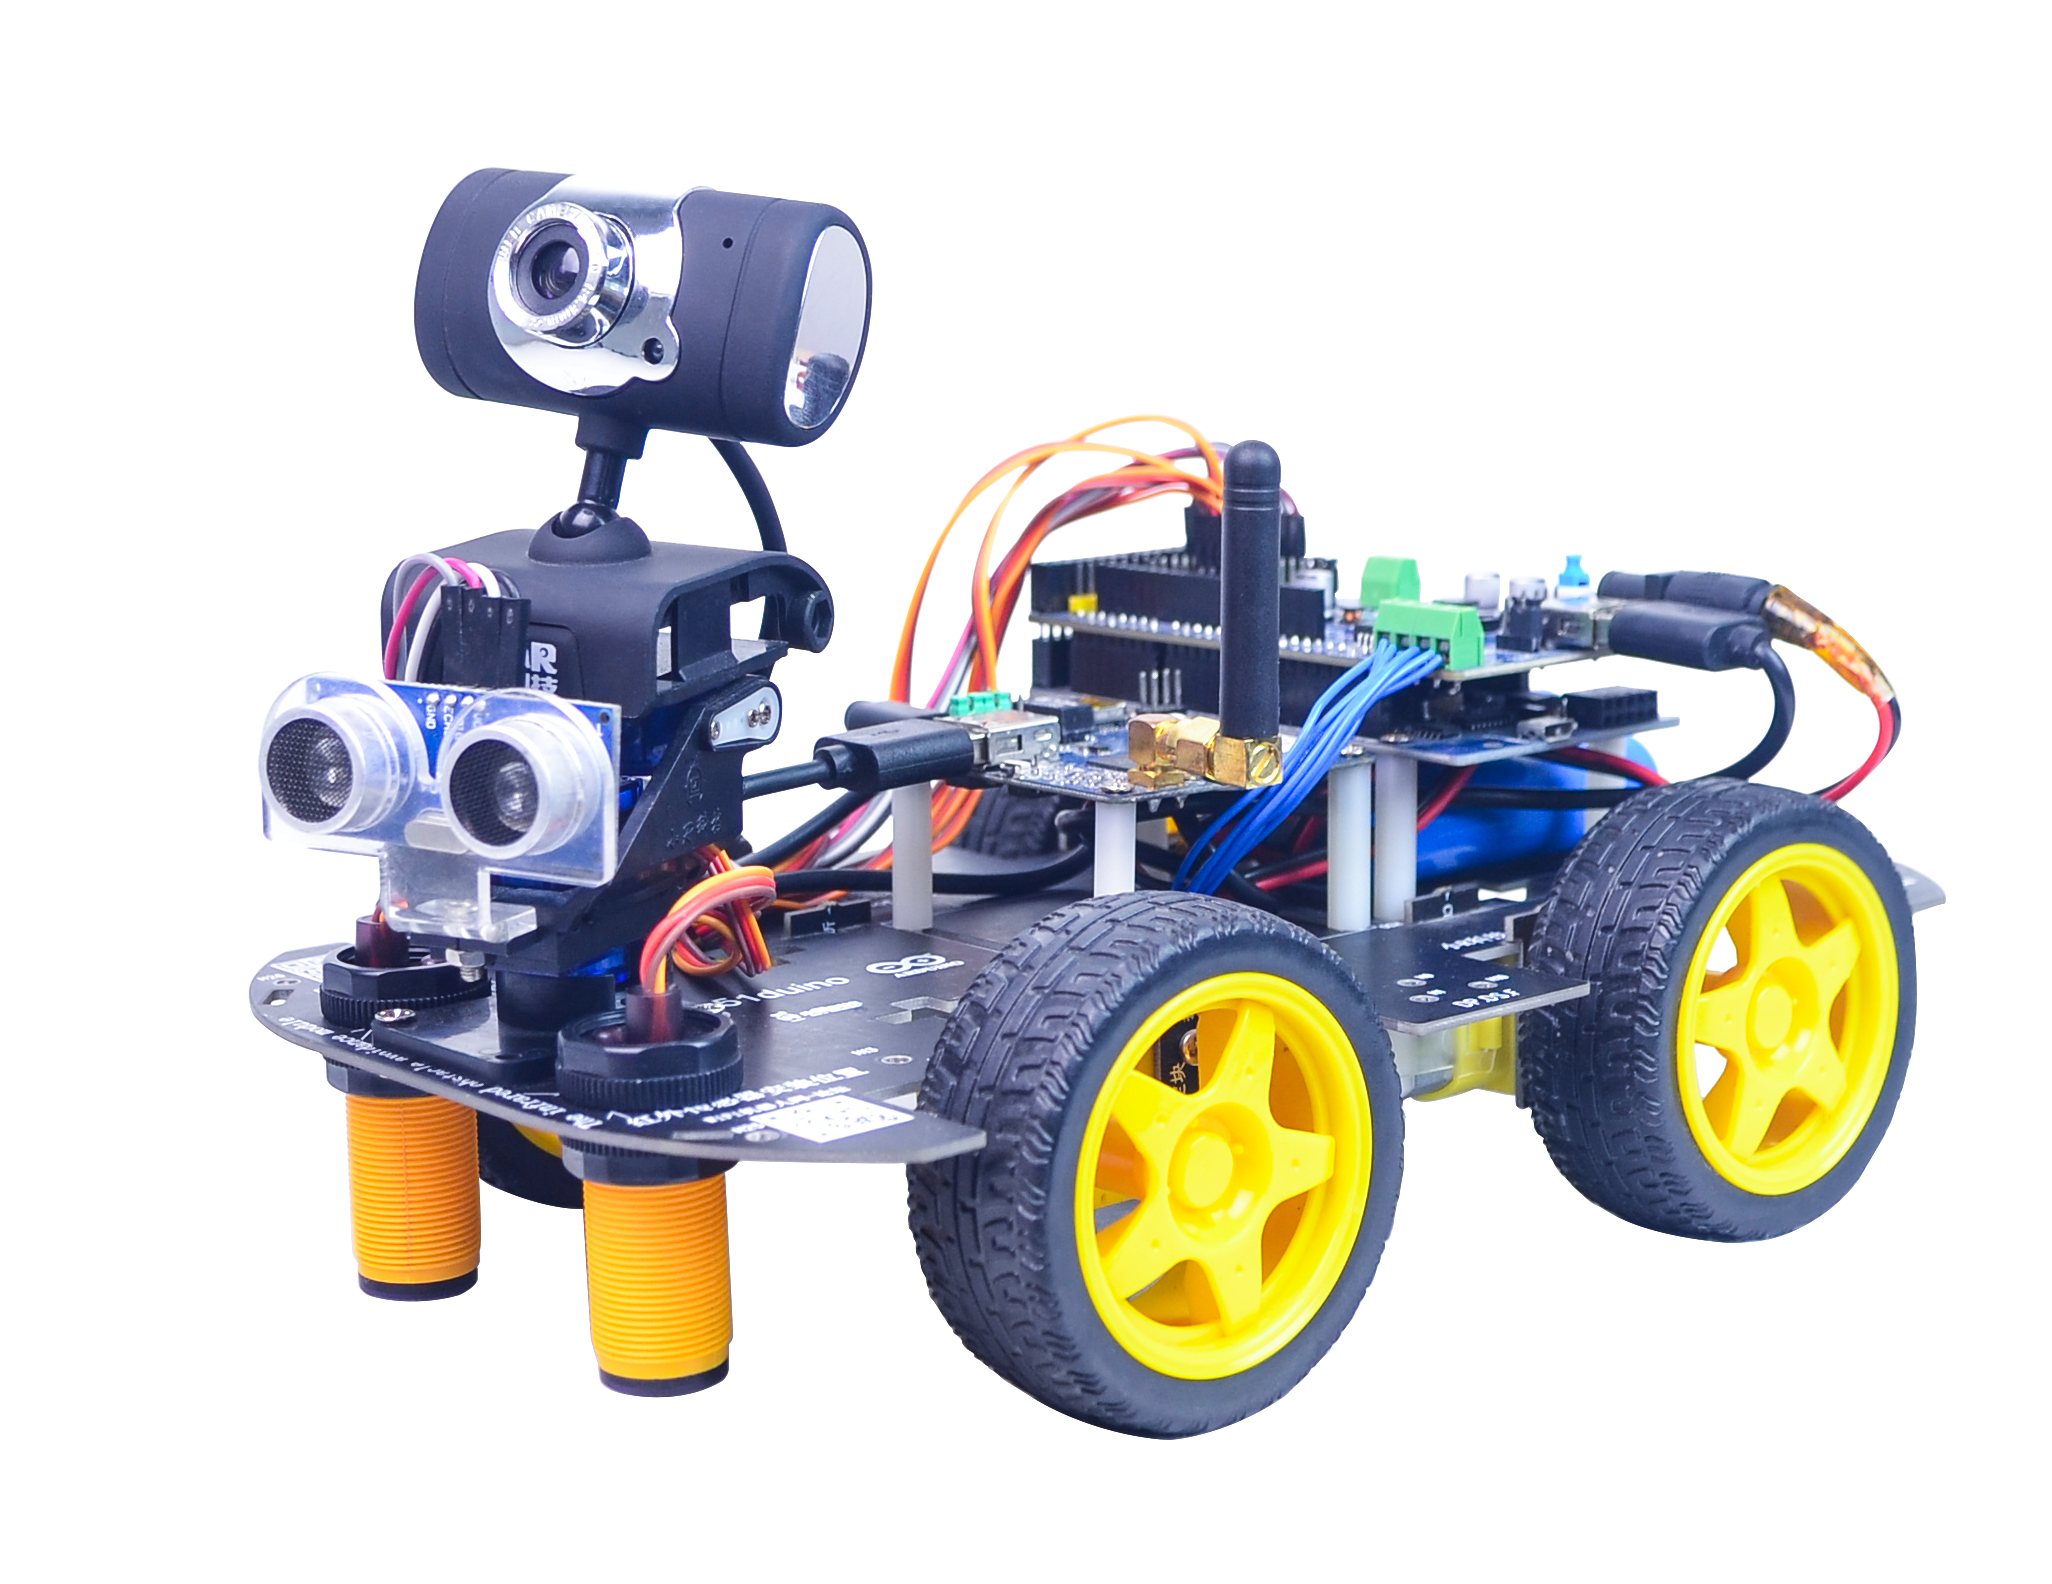
We had known about how to make a WIFI smart robot car, so what can we do with this little robot in real application? I believe everyone will think of this: remote security monitoring and control! Okay, this tutorial specifically introduces how to connect our robot to the Internet, and then we can control it on a global scale.The WIFI board/router used in this tutorial is WR703N, and the DB120 routing external network control settings.
一、 Fundamental
The basic principle of external network control is "port mapping" and "dynamic domain name". What is port mapping? In short, it’s to make a setting on your home wireless router, so that the access from the external network to a specific port on the router will be redirected to a designated IP host and port by the router. In this way, the home wireless router just like a "bridge", which connects the external network and the routing on the robot car, and then we can control the robot on the external network at home.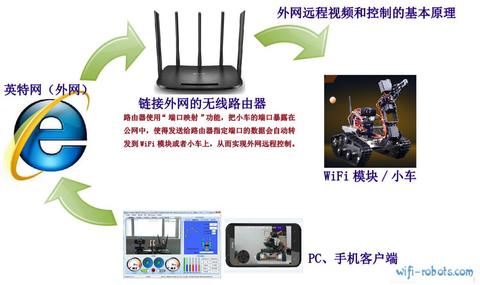
So what is a "dynamic domain name"? You can think about it: every time when the router of our home is turned on , the external IP address is different, so you need to query the external IP address of the router to control the car every time, and then reset the IP address of the control site, it's complicated. "Dynamic domain name" can solve this problem perfectly. First,You need apply for a dynamic domain name from the dynamic domain name provider. This domain name is unchanged, such as: www.liuviking.com, the provider will give you an account and password. And you can fill in the dynamic domain name function of the router with account and password. Each time the router is turned on, the router will log in to the server of the domain name provider, and the server can obtain the address of the router’s external network during this login, and then automatically help you with this new IP Bind it to the domain name www.liuviking.com. In this way, we don’t need to look for the current IP of the router every time. Simply enter this domain name to connect to our router.
What we have to do today is to use the above principles to complete the process from the external network to the wireless router at home, and then connect to the WIFI board on the robot.
二、External network mapping settings
- Home router settings.
First, you need a home router that can connect to the external network. This router serves is the bridge between the car and the outside world. Here, we have a home router that can access the external network normally, and its name is "xiao-R/409".
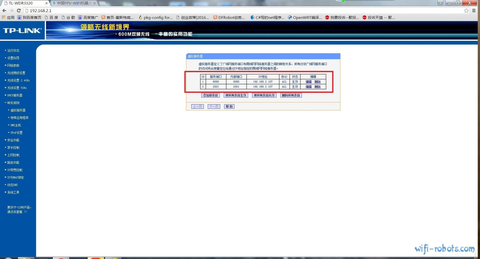
Step one: set forwarding rules.
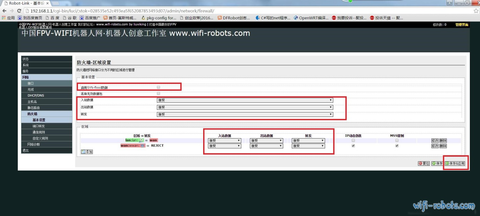
As shown in the figure below, log in to the 192.168.2.1 management interface of the home router and find the forwarding rule →"Virtual Server
Here, because our WIFI robot runs on two ports, port 8080 is the video port, and port 2001 is the control port, so we add two ports forwarding rules. We use 192.168.2.107 as the forwarding target client. This is the IP address of our WIFI board. This IP can be set by yourself, but it must be fixed. And within the DHCP scope of the home router.
Through this setting, the access to port 8080 and port 2001 from the external network will be re-sent to the client with IP 192.168.2.107, which is our WIFI board.
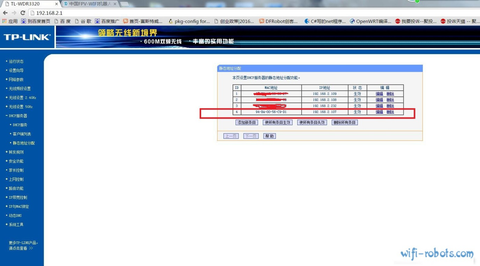
Step two: Set up static address allocation
As shown in the figure below, the MAC address in this step is the MAC address of the WIFI board, and the MAC address of the WIFI board can be found in its management page. The IP address is fixed at 192.168.2.107, the same as above.
Okay, the settings of the home router are over.
2、WiFi panel setup: We use the Chinese version of the interface, if the interface is English, you can follow this tutorial to set the language for Chinese: http://www.wifi-robots.com/thread-7995-1-1.html.
Step 1: Use the computer's wireless connection to the WiFi module signal.
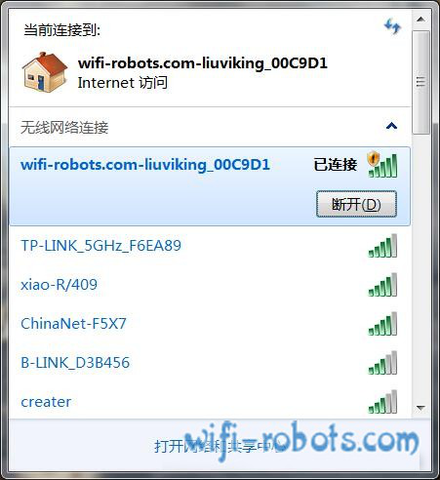
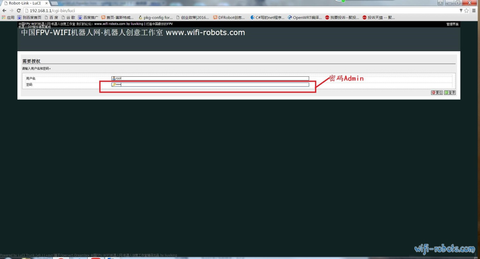
Step 2: Open the browser and access the system configuration interface of the 192.168.1.1 WiFi module, the default password is admin.
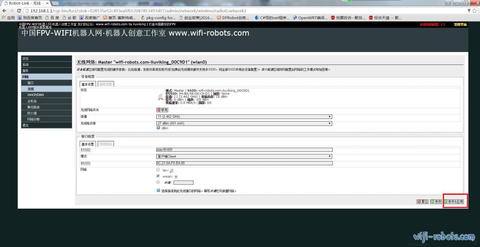
Step 3: Go to the "Network"-"Wireless" option of the module, click the "Scan" button on the right, the module will automatically scan the surrounding router signals, and wait a few seconds.
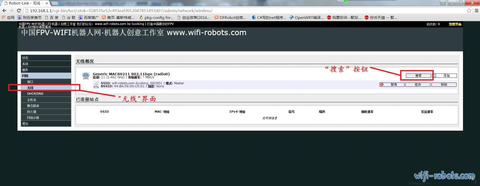
Step 4: Find the home router name "xiao-R/409" we want to connect to in the wireless list, and click the "Join Network" button on the right.
Step 5: The browser will pop up the password input interface, as shown in the figure below. In the WPA key option, fill in the Internet password of the home router "xiao-R/409", and then click the "Submit" button in the lower right corner.
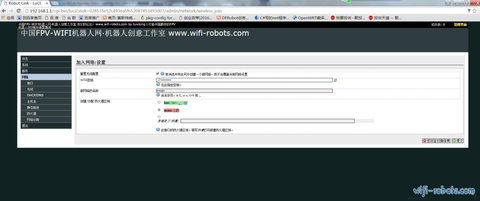
Step 6: The browser pops up the confirmation interface of wireless parameter, you don’t do any modification, directly "Save & Apply" in the lower right corner to make the system settings effective.
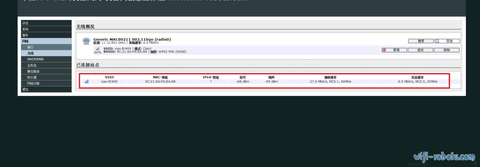
At this point, the WiFi module has been switched to Client mode and connected to the wireless network of the home router "xiao-R/409". At this time, you can no longer find the wireless signal of the WiFi module, because In Client mode, the WiFi module will not transmit signals.
Use the computer's CMD window to ping the IP of the WiFi module, you can see that it can be pinged, indicated that the WiFi module is in the same local area network as the computer, and the module has been connected to the local area network.

We will use a wired network cable to complete the next operation.
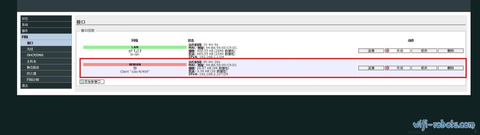
Connect the WiFi module and the computer network port with a wired network cable, and also use a browser to visit 192.168.1.1, and then open the "wireless" interface, you can see that there is an item "xiao-R/409" in the connected site, in the "interface" of the page, you can see the interface WWAN, and the interface has obtained IP 192.168.2.107 which assigned from the "xiao-R/409" routing , this IP depends on your home router DHCP range, mine is 192.168. 2. X segment, if your home router is the DHCP pool of 192.168.1.X segment, then the assigned IP should be 192.168.1.X.
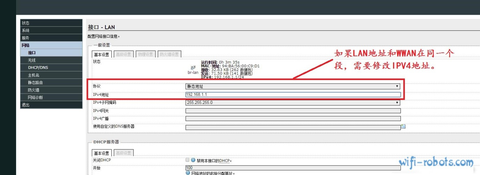
If the IP address of your LAN interface and the IP address of WWAN are in the same segment, you need to click the "modify" button on the right side of the LAN interface to change the IP to a segment different from WWAN. For example, WWAN is 192.168.1.3, then the IP of LAN should be changed to 192.168.2.1 or 192.168.3.1, etc. After modifying the LAN address of the WiFi module, if you need to access the management interface of the WiFi module, it will no longer be the original 192.168.1.1, it will been the IP address that you modified, as shown below:
In this case, because our home router is on the 192.168.2.X network segment, the WiFi module IP assigned to us is 192.168.2.107, and our WiFi module’s LAN address is 192.168.1.1, which is not in the same network segment. So you should go to the next step directly.
Step 7: Turn off the firewall of the WiFi module, as shown in the figure below, all "rejected" are changed to "accept", and then click "save & validate" in the lower right corner.
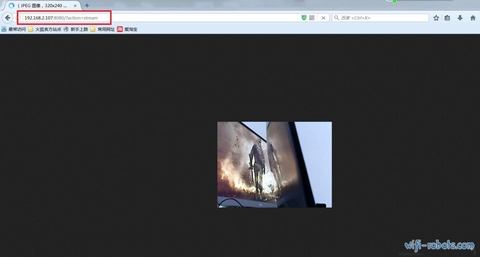
Well, with above configuration,now you can unplug the network cable , turn on the wireless of the computer, connect to the home router, and then open the Firefox browser, and enter "WiFi module IP in the home router: 8080/?action= stream" to try to access the video of the WiFi module in the local area network.
As shown in this example, the IP that our WiFi module gets is 192.168.1.107, so when we enter "192.168.1.107:8080/?action=stream" in the Firefox browser, we can see the video of the WiFi module which taken by the camera is appears in the browser. It proved that the video transmission within the LAN is OK.
Now, let's try to view the video remotely, log in to www.ip.cn website, or log in the router status page of the home router, you can see the IP address of the current router to the external network, and replace this address with the one that we used to watch the robot camera video Address. For example, we assume the router’s external IP is 202.119.23.122, then send the address http://202.119.23.122:8080/?action=stream to your friends whom are staying on the external network and let him open it with the Firefox browser. If everything is normal, he can see that the video’s window is displaying the real-time video of the current camera in the page ,which is the same effect as what we see by connecting the WIFI car directly.
OK, at this step, it means that the external network mapping control smart car robot is set successfully. So how to view and control the video if you use the PC version and mobile version PC developed by the studio? The operation is as follows:
Open the "Settings" interface of the control terminal, and fill in the video address in the video address item: http://your current router external network IP address: 8080/?action=stream . The item of Control address : your current router external network IP address Control port: 2001
that's fine.
After testing by several foreign friends, we have found that the video transmission speed is very good, it can reaching 7fps basically, and there is no obvious screen jam.
Two, the settings of dynamic domain name
If it is not too trouble, then the above settings can be used to control the smart car robot at home with Internet wherever you are in the world . Of course, as long as your home router is turned on, this IP can be maintained forever, but inevitably it will be closing In the case , you have to re-query the external network IP of the current route when it is closed each time,how troublesome is!
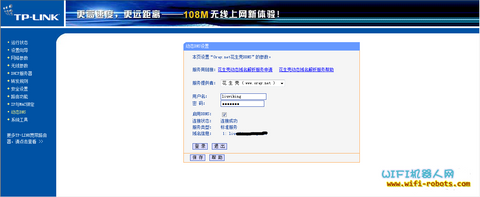
So in order to solve this problem, you can go to the service provider of Peanut Shell dynamic domain name or 3322 domain name to apply for a dynamic domain name. At the same time, they will provide an account and password. Take Peanut Shell as an example, you fill in the account and password in the dynamic DNS option of the home router ,As shown below:
After saving, when you restart the home router each time, you don’t need to care about the current external network IP, because it has been bound to your dynamic domain name, you only need to replace the IP part of our control terminal with your dynamic domain name ! (Note: The host computer control terminal of V1.25 version already supports dynamic domain name, and the domain name can be directly filled the control address.)
Remarks: Because there are many regions of the network operators have blocked ports or enabled intranet IP in china, remote video or control is not possible in this case, so the tutorial of port forwarding control needs to be adapted to local conditions and cannot be guaranteed to be 100% success.