
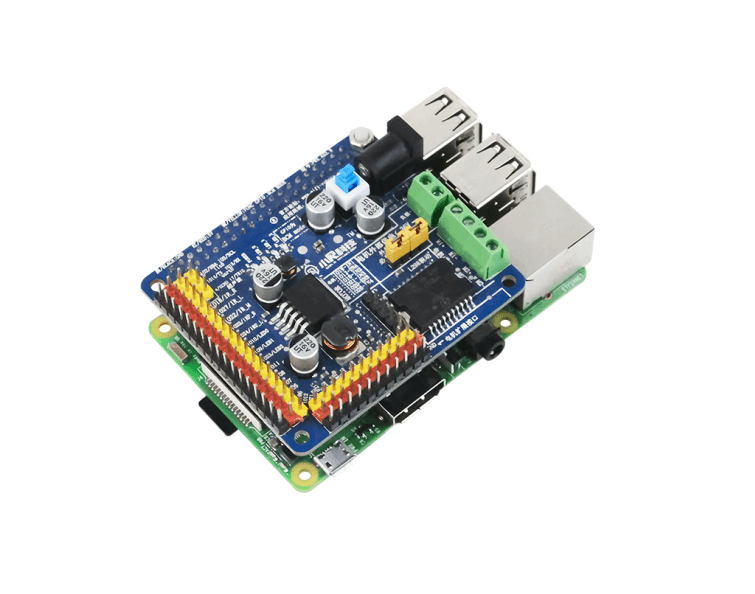
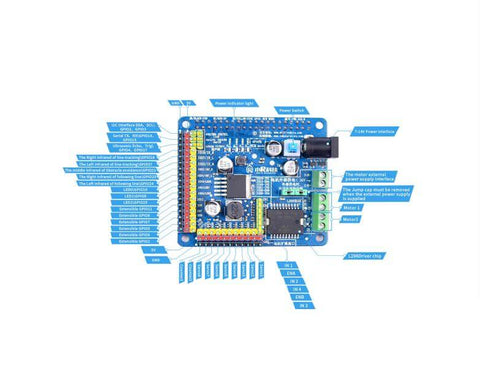
1、Description of driver board function and interface

PWR.A53 Robot Driver Board is an expansion shield for Raspberry Pie 3B+/4B, it mainly contains the following features:
1, regulator : 7-12V DC input voltage can be bucked to 5V or other voltage for supplying the main chip, or External equipment such as motors.
2、Motor drive: L298N motor drive chip to drive the motor forward, reverse, stop, acceleration, deceleration.
3. Servo drive: the driver board has 8 servo drive output interfaces, which can be used to power the servo with internal voltage. Simultaneously drive 8 5V PWM servos with a maximum current of 100mA.
4、Sensor driver: the unoccupied GPIOs on the driver board are directly led to the bottom of the raspberry pi, and marked with yellow pins. Each group of GPIOs has 5V and GND power supply pins, marked in red and black, respectively.
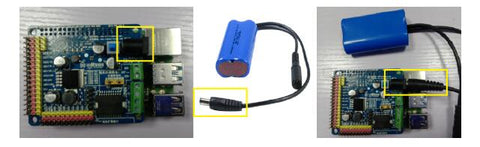
5、External power supply: the motor and servo of the driver board support the external power supply mode, when the internal current or voltage of the driver board is not enough to support the external power supply mode. To meet the needs of the motor and servo, a qualified power supply can be introduced into the circuit via an external power supply interface and supplied directly to the motor or servo. servos, but the control signal still comes from the main Raspberry Pi chip, thus achieving the need to control high-power motors or servos.
2、Start-up instructions
1、Connect the power supply to the power connector of the driver board with a DC specification,
voltage of 7-15V and current of at least 3A. Power interface size 5.5-2.1;
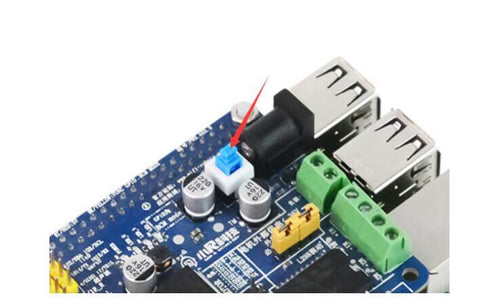
2、Press the blue power switch button, the blue LED on the driver board lights up, wait about 30
seconds, if you see blue LEDs is flashing alternately, the system has started successfully.
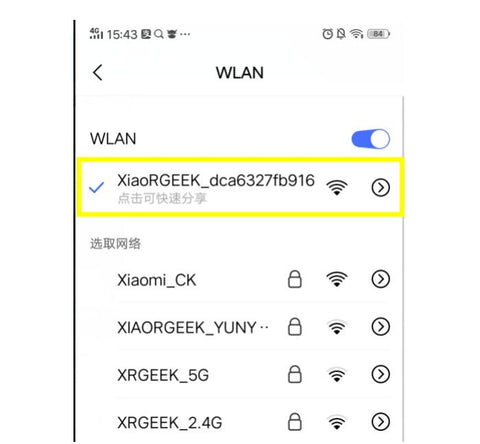
3、If you are using your phone for control, turn on your phone's WLAN function and search for
the surrounding WiFi signal which begins with XiaoRGEEK and connects to it.
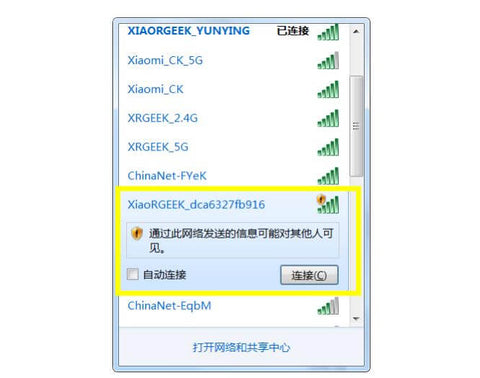
4、If you are using a wireless-enabled PC for control, turn on the wireless signal icon in the lower
right corner of the computer and search for nearby WiFi Signal, find the signal starting with
XiaoRGEEK and connect.
3、Software Function Description
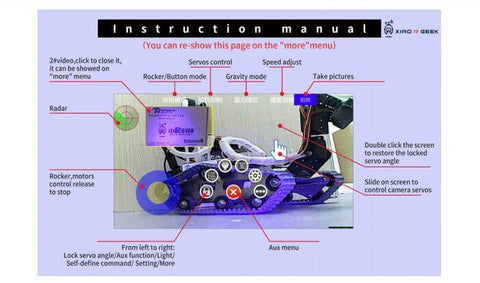
1、Use mobile APP to control the robot
The phone stays connected to the robot's WiFi signal
Open the app, select "WiFi mode", enter the control interface, the control functions are as
follows.
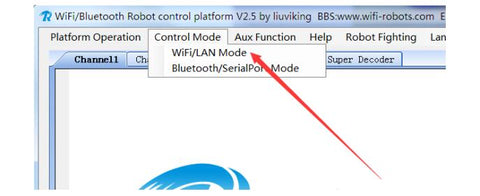
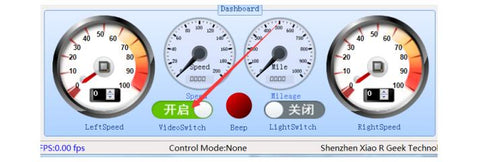
2、Use PC computer software to control the robot
The computer stays connected to the robot's WiFi signal
①、Motor control: Open the PC software, select "WiFi/LAN mode", then use the WSAD keys of the
keyboard to control the robot go front and back, left and right respectively, and the robot will stop when the button is released.
②、Open Video: Select "Video" at the bottom left to open the robot's live video transmission screen.
③、Pan/Tilt Control: If ① and ② above are enabled, select "Aux Function" - "Mouse Camera" , and then use mouse to drag the pan/tilt control on the video screen.

4、Getting start to code development
1、Common Development Tools
Putty:Used to remotely login the Raspberry Pi system via SSH to execute commands.
Winscp:Used to remotely connect to the Raspberry Pi system to transfer files.
SDFormatter:Used to format the TF card before burning the image to the TF card.
Win32DiskImager:Used to burn the image to the TF card.
2、System Image Burning
Note: If you are using the TF card that comes with the product, then the TF card has a built-in image of the robot system. If you have problems with your own blank TF card or the original image, then you need to flush the robot system image to the TF card again. The system image burning tutorial is as follows:
①、Insert the TF card into the card reader, and then plug the card reader into the computer's USB port, at this point you can see TF card on the computer has been recognized as a USB storage device.
②、Use the SDFormatter to format the TF card.
③、Use Win32DiskImager to write the robot system image to the TF card.3、Robot Source Code Development
①、Location of the source code in the Raspberry Pi
system:/home/pi/work/wifirobots/python_src
You can use Putty or Winscp to log into the Raspberry pi system to see the corresponding files.
The username is: pi
The password is: raspberry
The robot IP for the login system is 192.168.1.1 (using WiFi connection) or 192.168. 88.100 (using RJ45 connection)
The entry point program file is:wifirobots.py
This program will run automatically when Raspberry Pi starts, if you wish to run the program directly after modifying the code to see the effect, but not restart Raspberry Pi, you can first check the PID of the wifirobots.py process with the ps -aux command. And use the kill command to end the current wifirobots.py process, otherwise it won't work due to port conflicts.
②、Modify source code
The source code is developed in Python and can be edited using any text editor.
5、Common problems and troubleshooting strategies
1、No blue LED blinking after startup
①、Make sure the TF card is inserted into the Raspberry Pi.
②、Please make sure that the system image of the Raspberry Pi robot has been burned on the TF card, please note that the image on the TF card must be a system image provided by us and developed for the Raspberry Pi robot, not a usual Raspberry Pi image found on the Internet.
③、If both①and② above have been confirmed, then it is possible that the files on the TF card are corrupted for some reason, in this case, please follow tutorial 4 to flush the Raspberry Pi Robot system image to the TF card.
2、The wireless signal is unstable and often automatically disconnects after a successful connection.
①、Please check if the power supply is too low, you can test the battery by fully charging it first.
②、Please check whether the output power of the power supply is sufficient, the output current of the power supply should be at least 3A.
3、There is already a control software in control state, can another control software be connected to control?
The robot can only be controlled by one control software at a time, if you need to access other control software, please exit the currently connected control software.